Category: Revit
Revit classes and WPF? The first M in MVVM
I have been receiving inquiries on my blog regarding the use of Revit classes inside the WPF window, because I mentioned that we must not use the Revit API classes inside our view models, the reason being the Revit classes obstruct the use of view-view model functionality during the design of our WPF windows. So how are we going to use these functions/classes especially in Revit’s Document class when the WPF window is active?
This is now the turn of the first M in the acronym MVVM, which is the model.
We represent some of our Revit classes in a model that we will call here the Revit model.
Inside this Revit model, the UIApplication, UIDocument, and Document classes are represented by their respective variables, which are made private. These variables shall be initialized inside the model’s constructor, which has an argument of a UIApplication class. We name this modelRevitBridge.cs.
Below is a sample of it.
    class modelRevitBridge
    {
        // Just like what you do when creating a Revit command, declare the necessary variable such as below.
        private UIApplication UIAPP = null;
        private Application APP = null;
        private UIDocument UIDOC = null;
        private Document DOC = null;

        // The model constructor. Include a UIApplication argument and do all the assignments here.
        public modelRevitBridge(UIApplication uiapp)
        {
            UIAPP = uiapp;
            APP = UIAPP.Application;
            UIDOC = UIAPP.ActiveUIDocument;
            DOC = UIDOC.Document;
        }

        // This function will be called by the Action function in the view model, so it must be public.
        public List<string> GenerateParametersAndValues(int idIntegerValue)
        {
            List<string> resstr = new List();

            Element el = DOC.GetElement(new ElementId(idIntegerValue));
            if (el != null)
            {
                foreach (Parameter prm in el.Parameters)
                {
                    string str = prm.Definition.Name;
                    str += " : ";
                    str += prm.AsValueString();

                    resstr.Add(str);
                }
            }

            return resstr.OrderBy(x => x).ToList();
        }
    }
Below is the view model that we integrate with the view later. Name this as viewmodelRevitBridge.cs. This class has a Dictionary that holds all the wall types’ name and id in integer value. It also has a variable of type int that holds the selected value from the combo box, as well as a list of string declared as an ObservableCollection where we save all the parameter information of the selected wall type. Also, we create a pair of command variable and action function to be connected to the button that will generate the parameters in strings.
        private Dictionary<string, int> _dicWallType;
        private int _selectedWallType;
        private ObservableCollection<string> _listParameters;

        // Declare the Revit model class here.
        // Consequently, create a get-set variable representing this.
        private modelRevitBridge _revitModel;

        public Dictionary DicWallType
        {
            get
            {
                return _dicWallType;
            }

            set
            {
                SetProperty(ref _dicWallType, value);
            }
        }

        public int SelectedWallType
        {
            get
            {
                return _selectedWallType;
            }

            set
            {
                SetProperty(ref _selectedWallType, value);
            }
        }

        public ObservableCollection<string> ListParameters
        {
            get
            {
                return _listParameters;
            }

            set
            {
                SetProperty(ref _listParameters, value);
            }
        }

        //  Commands
        // This will be used by the button in the WPF window.
        public ICommand RetrieveParametersValuesCommand
        {
            get
            {
                return new DelegateCommand(RetrieveParametersValuesAction);
            }
        }

        // The get-set variable
        internal modelRevitBridge RevitModel
        {
            get
            {
                return _revitModel;
            }

            set
            {
                _revitModel = value;
            }
        }

        // The action function for RetrieveParametersValuesCommand
        private void RetrieveParametersValuesAction()
        {
            if (SelectedWallType != -1)
            {
                ListParameters = new ObservableCollection(RevitModel.GenerateParametersAndValues(SelectedWallType));
            }
        }

        // Constructor
        public viewmodelRevitBridge()
        {

        }
The following, on the other hand, is a sample of a view of our sample project, coded in XAML. Let us name this viewRevitBridge.xaml. This view will have a combo box and a list box.
Edit the corresponding xaml.cs file as well so that we make this window disposable and we hide the minimize and maximize button.
<Window x:Class="RevitBridgeSample.viewRevitBridge"
        xmlns="http://schemas.microsoft.com/winfx/2006/xaml/presentation"
        xmlns:x="http://schemas.microsoft.com/winfx/2006/xaml"
        xmlns:d="http://schemas.microsoft.com/expression/blend/2008"
        xmlns:mc="http://schemas.openxmlformats.org/markup-compatibility/2006"
        xmlns:local="clr-namespace:RevitBridgeSample"
        mc:Ignorable="d"
        Title="Revit Bridge Sample" Height="456" Width="279" ResizeMode="NoResize" WindowStartupLocation="CenterScreen" ShowInTaskbar="False" SourceInitialized="Window_SourceInitialized">
    <Window.DataContext>
        <local:RevitBridgeViewModel/>
    </Window.DataContext>
    <Grid>
        <ComboBox x:Name="comboBox" Height="35" Margin="10,10,10,0" VerticalAlignment="Top" ItemsSource="{Binding DicWallType}" DisplayMemberPath="Key" SelectedValuePath="Value" SelectedValue="{Binding SelectedWallType}"/>
        <ListBox x:Name="listBox" Margin="10,95,10,77" ItemsSource="{Binding ListParameters}"/>
        <Button x:Name="bOk" Content="OK" HorizontalAlignment="Right" Height="37" Margin="0,0,93,10" VerticalAlignment="Bottom" Width="105" IsDefault="True" Click="bOk_Click"/>
        <Button x:Name="bCan" Content="Cancel" HorizontalAlignment="Right" Height="27" Margin="0,0,10,10" VerticalAlignment="Bottom" Width="78" IsCancel="True"/>
        <Button x:Name="bProp" Content="Retrieve Parameters and values" Height="30" Margin="10,50,10,0" VerticalAlignment="Top" Command="{Binding RetrieveParametersValuesCommand, Mode=OneWay}"/>
    </Grid>
</Window>
Lastly, this will be the sample code for the Revit command, which will run the WPF window.
class RevitBridgeCommand : IExternalCommand
{
   public Result Execute(ExternalCommandData commandData, ref string message, ElementSet elements)
   {
       UIApplication uiapp = commandData.Application;
       UIDocument uidoc = uiapp.ActiveUIDocument;
       Application app = uiapp.Application;
       Document doc = uidoc.Document;

       try
       {
           // Get all the wall types in the current project and convert them in a Dictionary.
           FilteredElementCollector felc = new FilteredElementCollector(doc).OfClass(typeof(WallType));
           Dictionary<string, int> dicwtypes = felc.Cast().ToDictionary(x => x.Name, y => y.Id.IntegerValue);
           felc.Dispose();

           // Create a view model that will be associated to the DataContext of the view.
           viewmodelRevitBridge vmod = new viewmodelRevitBridge();
           vmod.DicWallType = dicwtypes;
           vmod.SelectedWallType = dicwtypes.First().Value;

           // Create a new Revit model and assign it to the Revit model variable in the view model.
           vmod.RevitModel = new modelRevitBridge(uiapp);

           System.Diagnostics.Process proc = System.Diagnostics.Process.GetCurrentProcess();

           // Load the WPF window viewRevitbridge.
           using (viewRevitBridge view = new viewRevitBridge())
           {
               System.Windows.Interop.WindowInteropHelper helper = new System.Windows.Interop.WindowInteropHelper(view);
               helper.Owner = proc.MainWindowHandle;

               // Assign the view model to the DataContext of the view.
               view.DataContext = vmod;

               if (view.ShowDialog() != true)
               {
                   return Result.Cancelled;
               }
           }

          return Result.Succeeded;
       }
       catch (Exception ex)
       {
           message = ex.Message;
           return Result.Failed;
       }
   }
}
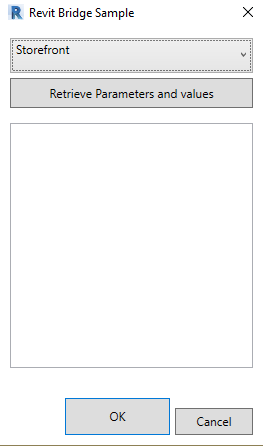
Running this code will turn out like this:
The image below will be the initial screen, which gets all the wall types inside your Revit project.
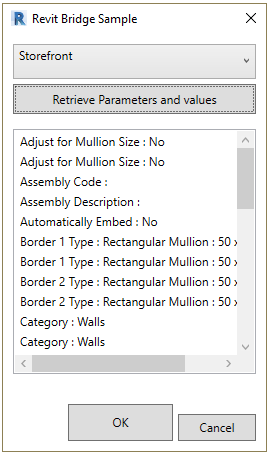
When you press the “Retrieve Parameters and values” button, all the parameters and their values of the selected wall type will be listed up inside the listbox.
You can also create a function that writes something in your Revit project, like editing parameters of renaming the wall types. In this case though, we have to wrap the writing part of the code inside a Transaction class, or else the program will fail.
When you do this, every time you execute the writing function, it registers a command in the undo-redo mechanism. So if you want to run this function multiple times and want to undo or redo these process just once, you need to wrap the WPF window loading inside a TransactionGroup and just before the end of it, use the TransactionGroup.Assimilate() function.
Using Celery.2DGraphItemSelector in Dynamo
Since I cannot produce a YouTube tutorial on how to use Celery’s 2DGraphItemSelector due to some hindrances in my surroundings, I rather post a blog to explain its usage. Sorry to keep you waiting for too long.
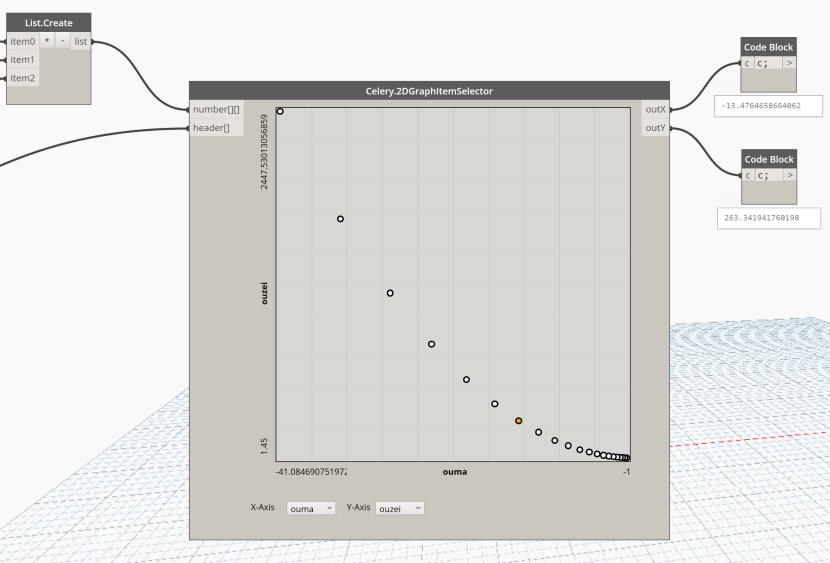
Anyway, as you can see in this node, there are two inputs and two outputs. The first of the two inputs expects a two-dimensional list of numbers; that means a list of lists of numbers. The second input is a list of string as headers that will be shown in the node through the two combo boxes. The number of lists connected to the input must the equal to the number of headers, and the headers must match the corresponding list of numbers they represent.
In this example I created three sets of numbers generated by number series. The first set is a simple sequence of numbers from 1 to 20, the second set contains the values of the equation x^2 where x is the set of numbers from the first set. The last set is the logarithmic values of the numbers in the first set to base 10.
So we also need to create a list of three headers for these sets of numbers. Let us name them “linear”, “squared”, and “log10”.

Connect this number series to the number[][] input with the help of List.Create node, and the headers to the header[] input.
Once everything is connected, the graph automatically generates graphical points, each representing the set of numbers at each assigned index, and their positions in the graph will depend on the headers set in both X-axis and Y-axis. (As of this writing I discovered a bug wherein the combo box does not respond very well in Dynamo Studio, so I will be posting an update of Celery soon.)
The graph will also determine the minimum and maximum values in each axis, and it shall become the bounds for each axis. They will also be shown in the graph for reference. Also, try to change the X-axis and Y-axis headers using the combo boxes at the bottom part of the node. The graph should respond to the selected headers as well as the limits and axis headers.

To know what are the values that each point represents in this 2D graph, hover over a point in the graph, and to get its values into the outputs, just click on the point, and the output ports will obtain the X and Y values each. These values shall be used for further checking and more extensive operations succeeding this node.
The Best Application
Now, the bottom-line of the usage of this node is, where is it applied?
If you are familiar with the Optimo package in Dynamo, the NSGA II node has an output of two-dimensional list of numbers, but we have to do something in order to pick the better values we need from this result. While it is obvious that the first items represent the best answer the NSGA II node offers, oftentimes we need options, and those options will come from another set of values coming from the NSGA II node. So how would we know easily what values will satisfy the criteria we have? Here is where 2DGraphItemSelector comes in.
If you have Optimo installed, try to open Optimization Example-02-SCH.dyn file from the Optimo example files.
Create a new Celery.2DGraphItemSelector node and position it just after the code block node that has an a[1] value in it (after the LoopWhile node). Try to connect this node to the NSGA II node in one of the existing samples from Optimo, and add a code block that contains a list of three strings (in this example, it is “X”, “Y” and “Z”). Connect the code block of numbers and headers to the proper inputs, and see for yourself.

Be noted, however, that when reinstating the solution to a custom node (that represents an objective) that produces geometry or model changes in Revit, you need to add a new node of that objective and connect the outX and outY ports to the missing inputs of the objective node. This will eventually reveal the result of the model whenever you select a point from the graph node.
View-ViewModel-ing for your WPF Windows (Revit API with WPF Series 3/3)
This is a long overdued post. Apologies for the very long wait. If I would be allowed to make an excuse, I became busy working on a Dynamo package named Celery, which is still on a pre-beta release due to much time dedicated to my company work and physical workouts.
I will still process some of the codes and images that this post needs. So please stay tuned for the update.
Anyway, let’s go to the real topic.
In this part of the series, we will tackle how to associate values between the plugin class and the view model class, and between the view model class and the WPF window.
First, create some controls within the window like the one I did below.
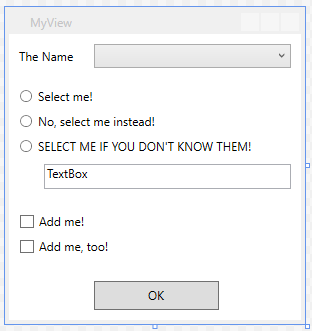
We have a combo box, three radio buttons, a text box, two checkboxes, and an OK button. These are some of the controls that are frequently used in windows. We need to associate some variables to the each of the controls, except for the radio buttons, which shares one variable.
To associate them, we need to create a definition class that we will call the view model class.
Before creating a view model class, let us download first the “Prism” library from nu-get. We will be using the Prism library as our base library for our MVVM classes.
Now, we create a new class file for our new view model class. Let’s name it “MyViewModel.cs”. Open the newly created file and modify the file so that it inherits function we need for class to become a view model class:
using Prism.MVVM;

namespace MyRevitWPFProgram
{
class vmodThisWindow : BindableBase
{

}
}
The BindableBase base class is just a simplified class derived from INotifyPropertyChanged interface class, and has the event declaration and function already contained in it.
Now we create the variables we need. All the controls have their corresponding types of variable so we must know what to assign to which. When gathering a string of text from a TextBox, we need a string variable. When we need a number for a TextBox, we need a number variable with a string converter. When we need something to monitor if an item is checked or not, a boolean for each of them, or an integer with converter and parameters for radio buttons. WPF beginners can get more details regarding these on the internet.
But one thing I would like to recommend: DO NOT USE ANY OF THE REVIT CLASSES WITHIN THE VIEW MODEL. Using these classes will not let you use the capabilities of WPF automation functions in Visual Studio, and eventually the window will not display in the Design Screen disabling you to modify the contents of your window graphically. I have just verified this even very lately with the Visual Studio Community 2015.
So I declare my variables for my window something like below.
private ObservableCollection<string> _StringSelection;
private string _selectedString;
private int _radioOption;
private bool _isSelectedOption3;
private bool _isSelectedAddMe;
private bool _isSelectedAddMeToo;
private Dictionary<string, int> _dicIdString;

public ObservableCollection<string> StringSelection
{
get
{
return _StringSelection;
}

set
{
_StringSelection = value;
}
}

public string SelectedString
{
get
{
return _selectedString;
}

set
{
_selectedString = value;
RaisePropertyChanged("SelectedString");
}
}

public int RadioOption
{
get
{
return _radioOption;
}

set
{
_radioOption = value;
RaisePropertyChanged("RadioOption");
}
}

public bool IsSelectedOption3
{
get
{
return _isSelectedOption3;
}

set
{
_isSelectedOption3 = value;
RaisePropertyChanged("IsSelectedOption3");
}
}

public bool IsSelectedAddMe
{
get
{
return _isSelectedAddMe;
}

set
{
_isSelectedAddMe = value;
RaisePropertyChanged("IsSelectedAddMe");
}
}

public bool IsSelectedAddMeToo
{
get
{
return _isSelectedAddMeToo;
}

set
{
_isSelectedAddMeToo = value;
RaisePropertyChanged("IsSelectedAddMeToo");
}
}

public Dictionary<string, int> DicIdString
{
get
{
return _dicIdString;
}

set
{
_dicIdString = value;
}
}
Here are the major tips that I would suggest when declaring variables in creating a view model class:
a. ) When you have a combo box in your window, know its purpose. For example, if you want to put data of some of the family types and select only one of them, use a Dictionary class and assign the names as keys, and the IntegerValue of the Ids as values. However, if the content seem to be complex (e.g. materials with name, id and color as you primary info), create a unique class for that content and include only the variables that you need. In this case, you may use either the simple List<> class or a more sophisticated IObservableCollection<> class (but since most of the time the contents of the combo box do not change, List<> will be enough).
When you create a Dictionary, never forget to input the word “Key” in the DisplayMemberPath property, and the word “Value” in the SelectedValuePath property. This will make the combo box propagate only the keys to show in the combo box, and when one is selected, return its corresponding integervalue of the id.
On the other hand, when using list of classes, use the Binding procedure to bind a class item to the DisplayMemberPath what to show in the combo box, and another class item to the SelectedValuePath property.
On both cases, bind a variable to the combo box’s SelectedValue property, with the type the same as what you bind in the SelectedValuePath property. This variable must be independent, and you may not need to add an RaisePropertyChanged() function to it.
b.) When declaring variable with get-set and takes part of the user input handling from any of the controls inside the window, always call the RaisePropertyChanged(“<name of the public variable>”) on the last part of the ‘set’ segment.
c.) Do not include arguments in the constructor. Do not also create overloads of the constructor. Do all the variable assignments after creating the view model class.
Automating the Binding Procedure
When all the variables are declared, COMPILE FIRST THE PROGRAM AND MAKE SURE IT IS FREE OF ERRORS. Otherwise, you cannot use the interactive approach of binding contexts to the WPF window.
Now we will use this interactive approach to bind the view model class to our XAML window.
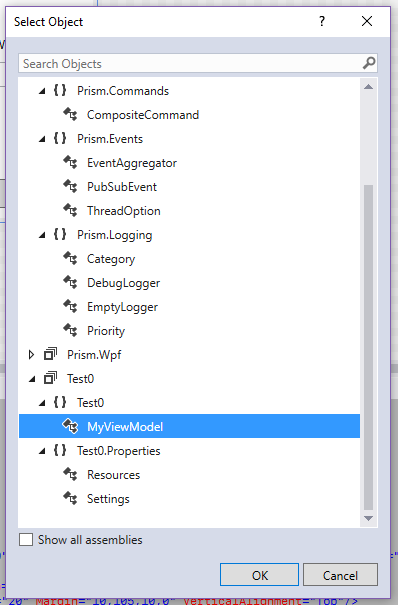
Select the window frame in the design view of the XAML, and from the Properties window, go to the DataContext property and click the “New” button adjacent to it. This will bring you to the window further below.

Select “MyViewModel” class from the nested list and press OK. This will automatically integrate your view model to your WPF window.
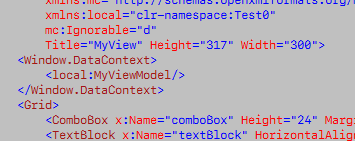
In the image above, you can verify that Visual Studio made us bind our view model class to the WPF window by enclosing our view model class with the <Window.DataContext>.
Next we bind our variables to the window controls the similar way.
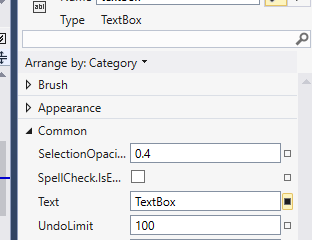
First, select the TextBox from the design view, and from the properties, click on the small box on the right (which is shaded black; it indicates it has a set value).
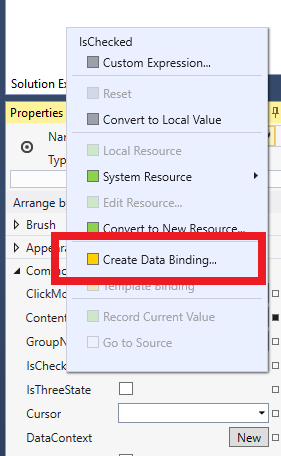
Then from the context menu, select “Create Data Binding…”
This will bring you to another window like the one below.
Make sure the Binding Type is set to Data context, so that you can see the view model class we created on the right side of the window. Expand MyViewModel, and there comes all the variables we declared. Select the SelectedString : (String) and press OK.
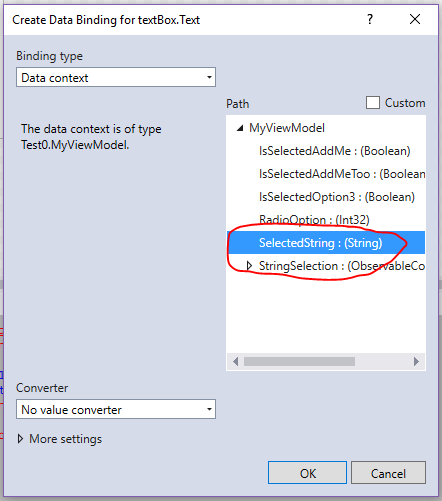
Now we can check from the XAML code if it made us the binding. It should be like I have below. You can see that in the Text property of the TextBox SelectedString is bound to it.

Binding the Radio Buttons
One complicated area here is binding three radio buttons in a single variable that is RadioOption. We will be using a converter and integrate converter parameters in each of the radio buttons.
Below is how I wrote my Converter class. I created a new class named MyConverterRadioButton, which is derived from the IValueConverter interface.
public class MyConverterRadioButton : IValueConverter
{
public object Convert(object value, Type targetType, object parameter, CultureInfo culture)
{
return (parameter.ToString() == value.ToString());
}
public object ConvertBack(object value, Type targetType, object parameter, CultureInfo culture)
{
return (bool)value ? parameter : Binding.DoNothing;
}
}
Since we are using the automation features in the Properties window of Visual Studio, we will associate the converter class to all the radio buttons.
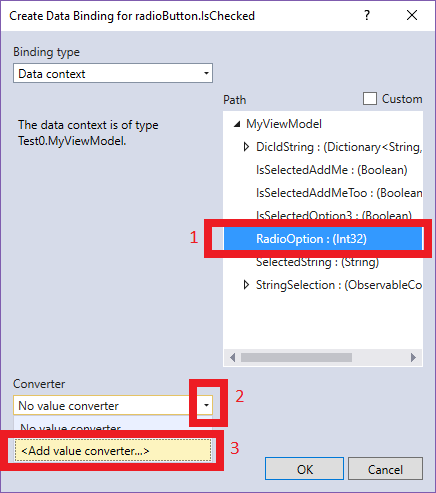
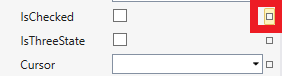
In the properties window, click the square on the right of the IsChecked property to reveal the window below. On the right hand side of the window, selected RadioOption variable (1), and then pull down the combo box in the Converter option below (2), and then select “<Add value converter…>” (3)
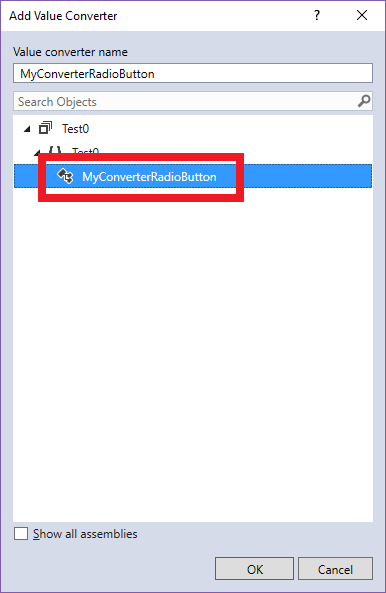
This will bring you to a child window like the one below. If the converter class you created appears (in this case, MyConverterRadioButton), then select the class and press OK. Otherwise, revert and compile the program first before returning to this window.
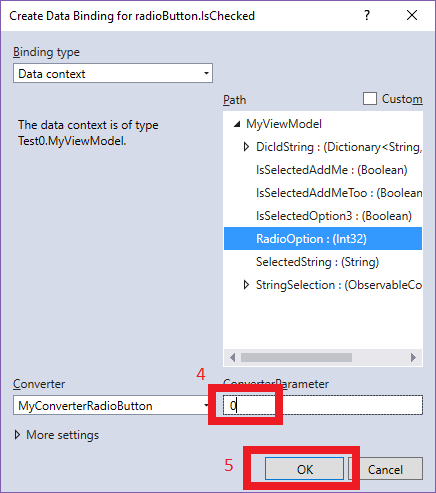
When the converter class is selected, we can now assign a converter parameter in each of the radio buttons using the previous window. In the ConverterParameter field, enter “0” for the first radio button, “1” for the second, and “2” for the third one (4). Press OK when done (5). The result will reflect in the XAML code.
Next we associate the text box to be enabled for editing once the third radio button is selected. Select the Text Box of the window, and in the Properties panel, press the square on the right side of the IsEnabled property. Then from the context menu, select Create Data Binding.
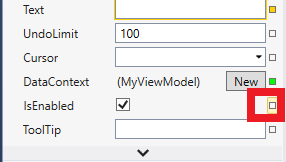
From the window, select the variable IsSelectedOption3 (1) and press OK (2).

Then we will just update our view model class with the code below inside the RadioOption set function in order to activate it every time the third radio button is selected, and deactivated otherwise.
public int RadioOption
{
get
{
return _radioOption;
}
set
{
_radioOption = value;
IsSelectedOption3 = value == 2;
RaisePropertyChanged(“RadioOption”);
}
}
Binding the Checkboxes
Binding the Checkboxes is straightforward as the method is similar with others mentioned above. But this time, we have to click the square of the IsChecked properties of the two checkboxes, and create the data bindings. Use IsSelectedAddMe and IsSelectedAddMeToo correspondingly.
Binding a Button Command
Although this area does not play a significant role in our example, it is essential to learn how to bind them and how they function when the program is executed.
Add this code inside the view model class and re-compile the program.
#region Commands and Actions
public ICommand OKCommand
{
get
{
return new DelegateCommand(OKAction);
}
}
private void OKAction()
{
// This function will be executed after the button events.
}
#endregion
We simply give an action to the OK button whenever it is pressed. To give the event an action compatible with MVVM, first we create a variable OKCommand out of an ICommand class. Then inside its get function, the code just returns a new declaration of DelegateCommand that has an argument of OKAction, which will be a void function to be invoked. DelegateCommand is a function from Prism, so be sure Prism is installed in your project to be able to use it.
Once the command is called, the function invoked will execute, however, as mentioned in the comment above, OKAction will be executed after its event when pressed. So for example, you make an event from the Button named OKButton_Click(). The code inside OKButton_Click() will be executed first, before OKAction(). You can always verify it by debugging the program and see for yourself.
Now you know the sequence of the execution of the command events defined by the usual events and MVVM events, plan the program into its importance; what must come ahead and behind, or maybe, the necessity of each other. In this case, since the OK button is the only button, we may not add code inside the OKAction, but when it comes to other buttons, this trick may come handier.
Now we finished defining our Command events for our button. Compile it and see if there are errors. If there are none, let us bind it from the Properties window.
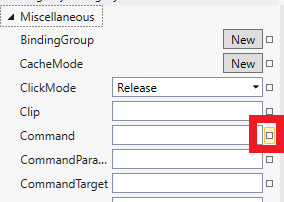
In the Miscellaneous group of the Properties window, there is an item there named Command. This item accepts any variable of type ICommand, which will be made clear further below. Click the square on its right and from the context menu, select Create Data Binding.
In the window, select the OKCommand variable (1) and press OK (2). If you notice, OKCommand is variable of ICommand, which is recognized by WPF.

…to be continued.
Joining AU 2015
Once again I will be joining Autodesk University Las Vegas. But this time, it will be different for me.
The first time I joined AU was in 2008. I went to assist my boss in his session.
But this time, I will be the one who is doing the session.
I will be covering various workflows based on what we are doing up to now in our office. Seeing them as beneficial to all the people in the BIM world, I chose them thinking that one day users will be able to benefit from it.
It is about interference checking; it is also about creation of designer’s template; it is also about detailing your models; it is also about Dynamo and my work line, which is programming with Revit API.
In the next few days, I will be posting some instructions on how to use the tools that I will be catering to the attendees, who I them a lot for pre-registering at my session.
See you in the next few days!
